Don’t Be Sour About Kraut

As a kid growing up in New York City, sauerkraut meant one thing to me: the salty slop you slathered all over a hot dog purchased from the ubiquitous Sabrett carts to drown out the awfulness of said hot dog. That, and mustard…lots of mustard. (I never understood ketchup on dogs – to me that was reserved for burgers, but I digress.)
I never appreciated sauerkraut until much later in life, and certainly never realised the health benefits of it. Of course, those benefits were pretty much non-existent in the kraut of my youth due to over-processing, pasteurisation, and likely inclusion of all sorts of unpleasant and/or unnecessary additives.
But now, due to the growing awareness of the importance of good gut microbiome, the humble kraut has undergone something of a resurgence. It may be that it never really went away in certain cultures. That is certainly the case with kimchi, essentially a Korean version of sauerkraut (but with many more ingredients) that has continued to be a staple of Korean cuisine. And certainly, you’ve always been able to find kraut on the menu at many eastern European restaurants, not to mention the aforementioned NYC hot dog carts, and of course the glorious Reuben sandwich (which, by the way, if you haven’t tried, you owe it to yourself to do so).
I won’t bore you too much with the history of this saline side dish, rather my aim here is to show you how easy and inexpensive it is to make your own super-nutritious and tasty kraut at home with a minimum of fuss and mess. Okay, a minimum of fuss, perhaps. Mess can certainly be a part of the process, at least the way I make it. But don’t let that dissuade you, it’s worth it!
Before I dive into the method, a word about commercially-produced sauerkraut. Anything bought in a shop that doesn’t need to be refrigerated will have been heat-treated to kill any unwanted bacteria. Unfortunately, this process also kills all of the good bacteria, removing the primary health benefits of ‘live’ sauerkraut. The lactic acid fermentation that occurs in uncooked, unpasteurised kraut contains live lactobacilli and beneficial probiotic microbes and is rich in enzymes. The fibre and probiotics can improve digestion and promote the growth of healthy bowel flora, protecting against many diseases of the digestive tract. Check out these articles for more information on how good gut bacteria can also improve your immune system, and reduce anxiety and depression.
It is possible to find live sauerkraut in shops, mostly of the ‘health food’ variety, but considering the minimal cost of the ingredients, they tend to be quite overpriced. So why not make your own? Here’s how.
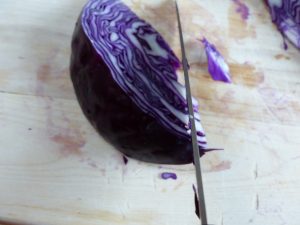
Start with a cabbage. It can be any type, green, white, red, Savoy, etc. Personally, I prefer a firm red or white cabbage as they tend to keep the best texture, but it’s your choice.

You’ll then need some salt. Please use sea salt, or even better, Himalayan pink salt, anything but iodised table salt. To be accurate, you ideally want a 2% saline solution. The easiest way to think about this is in grams. For every 100 grams of cabbage, you’ll need 2 grams of salt (100 grams x .02 = 2 grams). But, to be honest, I usually just use one tablespoon of salt for a medium sized cabbage. You can always add less salt to start, and then add more to taste. The cabbage should be salty, but not offensively so.
The salt content is very important, however. The salt draws moisture from the cabbage to create a brine. This brine creates a good environment for the proliferation of ‘good’ bacteria but discourages the stuff we don’t want in our kraut. It’s not foolproof, though, and sometimes you do get some unwanted mould or slime, particularly if you’ve under-salted your cabbage. Fortunately, I haven’t yet experienced this first-hand. Apparently, over-salting can prevent your friendly bacteria from growing too. If you suspect you’ve added too much salt, you can give the cabbage a rinse and start again.
You’ll also need a sealable jar for the cabbage to ferment in. And finally, you’ll need a little time. That’s it, no other ingredients necessary (I told you it was easy). Here’s the method in a nutshell:
Ingredients
1 cabbage
1 tablespoon salt
Peel off the outer layer or two of the cabbage. Try and keep them relatively intact, as you’ll use them later. Then slice the cabbage into fine pieces. This can be done by hand or with the shredder attachment of a food processor. With a firm round cabbage, I tend to quarter it, cut the core off each section, further slice each section in half, and the finely chop the remaining pieces. But I’m pretty handy with a knife. If you’re intimidated or just can’t be asked, cut it into eighths and feed each piece into the food processor. Easy peasy.

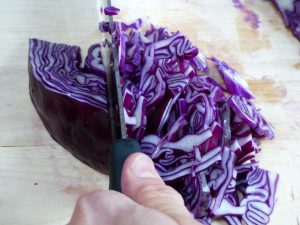
Put the shredded cabbage in a large bowl. Add the salt and then stick your hands in the stuff and mush it all around for 10 minutes. Some people skip the kneading step, but I find it really useful to draw the water out of the cabbage to create the brine. It can sometimes get a little messy, though. Word of advice – if you’re using red cabbage, don’t wear white clothes! Also, if you’ve got a cut on your hand, better wear some rubber gloves, or that salt will make you beg for momma.
After 10 minutes, you should have a liquidy mass of cabbage that will have shrunk sizably. Scoop the cabbage and brine into a suitably-sized jar. Take the reserved outer layer(s) of the cabbage and place it inside the jar, on top of the shredded cabbage, and press down so that it’s below the liquid line if possible. If you’ve got a little cup, ramekin, or another object that fits fairly snugly inside the jar, this will help to press it down and keep the cabbage submerged, which you want as it will help prevent any unwanted mould from growing on the cabbage.
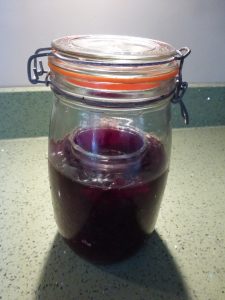
Store the jar at room temperature out of direct sunlight. Every day or two, see if you can press the cabbage down a little more into the brine. How long the kraut will take to be ready is not an exact science. I usually give it a taste after about a week. Once it starts fermenting, it will get tangier and tangier, so you should decide when it’s ready by your taste. If it just tastes salty, but not tangy, or just a little tangy, put it back and check it in another day or two. When it finally tastes how you like it, remove the layer of cabbage from the top and stick it in the fridge where it will last a long time.
What to do with it?
Eat it, duh!
But seriously, I love to put a few spoonfuls in all types of salads to give them a little extra zing. It also goes nicely alongside a pork chop, sausage, or on top of a stew. Try not to heat it too much, though, to keep the friendly bacteria alive. And if you ever find yourself in possession of an NYC hot dog that you feel compelled to actually eat, now you know what to do!